Valorant Breeze Map Guide: How to Play the Tropical Paradise


Breeze is one of the best maps in Valorant. To win it, you should study the map and use its structure to the best of your abilities, here’s how.
Valorant’s map pool has constantly been on rotation for the past six months. Recently we saw Breeze getting removed and Bind making a return in the competitive map pool. However, this does not mean it is permanently out of the picture. The devs are bound to bring it back and change it up for the better. We have no tentative date for its re-release, however.
That being said, we will take a look at how you can play Breeze and take advantage of its map design to win your ranked matches in the game. Without further ado, let us get into it.
Contents
- Valorant Breeze Locations and Callout Guide
- About Attacking on Breeze in Valorant
- How to attack A Site
- Where to Plant The Spike on A Site?
- How to attack B Site
- Where to Plant The Spike on B Site?
- How to attack A Site
- About Defending on Breeze in Valorant
- How to Defend the A Site
- Ways to Retake on A Site
- How to Defend the B Site
- Ways to Retake on B Site
- Best Agents to Pick on Breeze in Valorant and Why
- Tips to Remember When Playing Breeze in Valorant
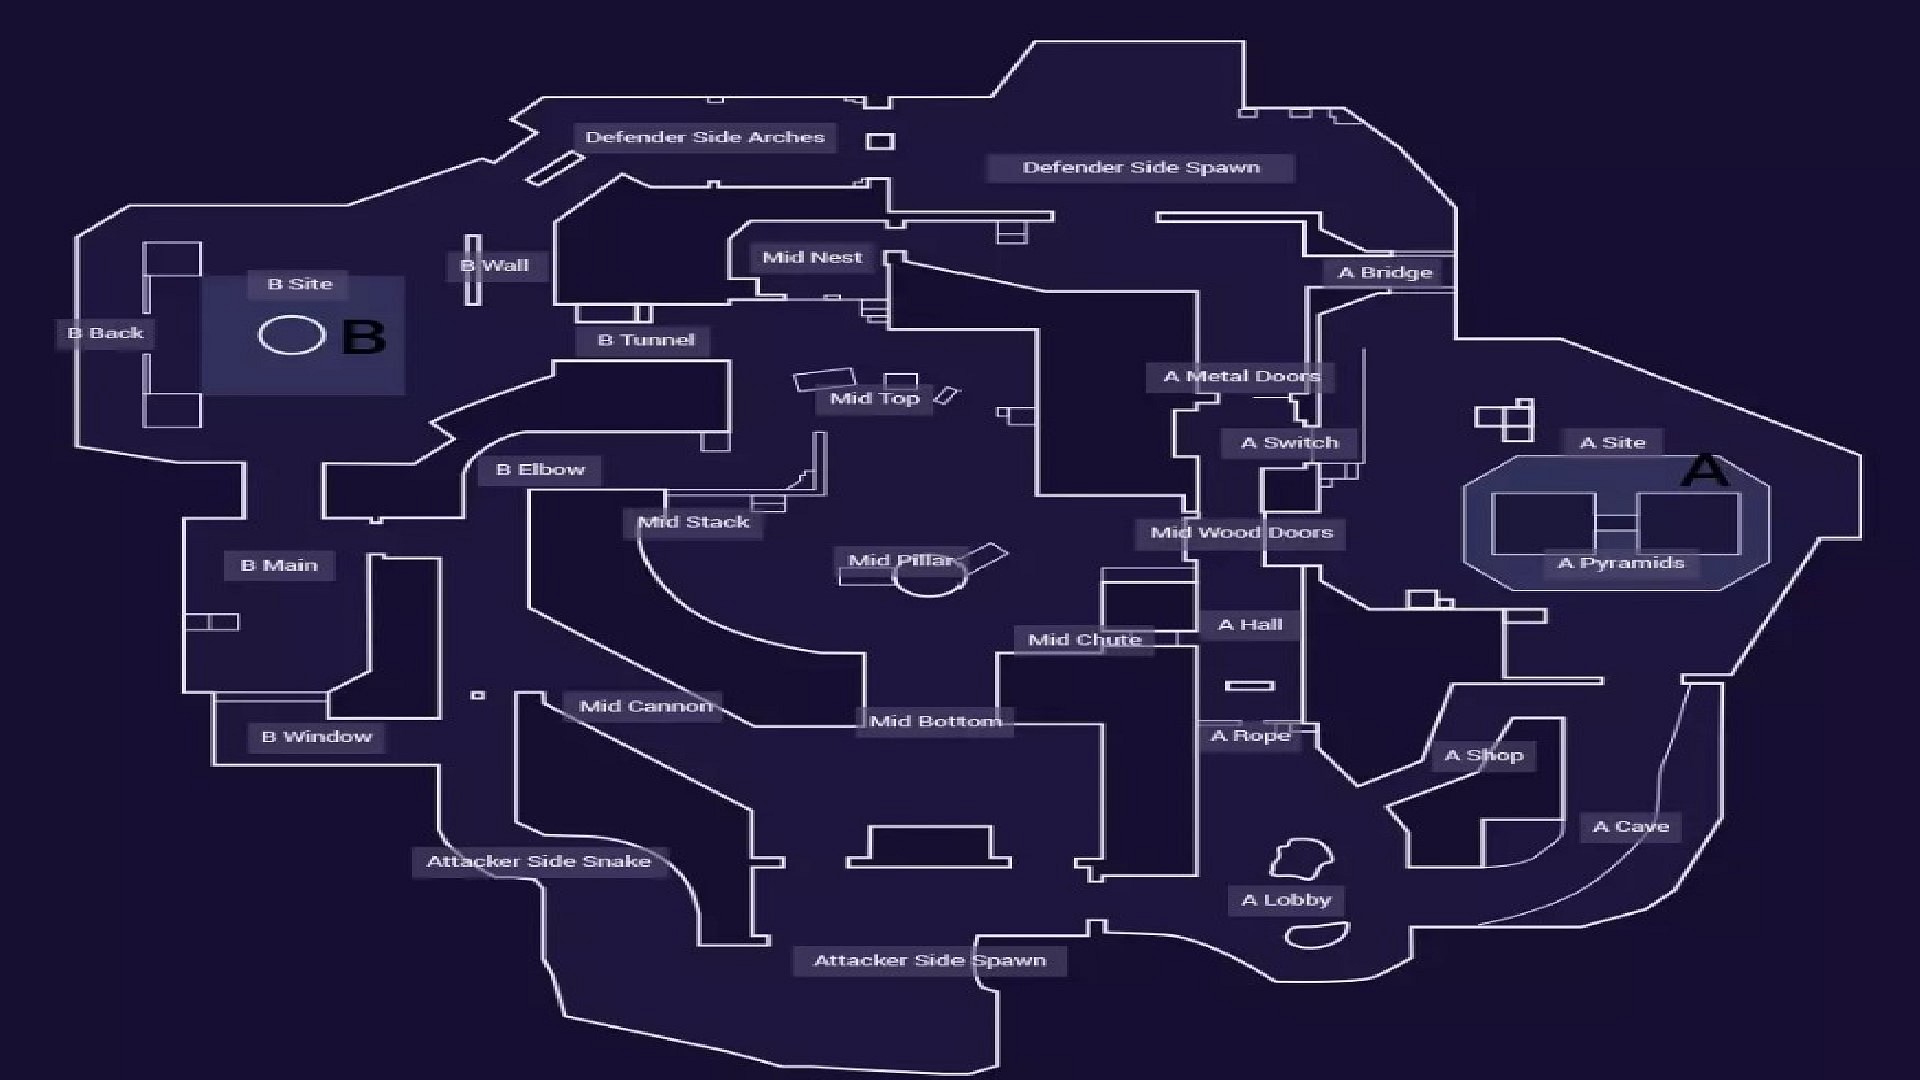
Valorant Breeze Locations and Call-out Guide
Breeze is a relatively open map that allows for lots of long-range gunfights. This lets Duelists thrive on this map without much effort. However, more than taking Duels, executing a site together matters a lot more.
To ensure that you execute properly and take advantage of its map design, you need to study both the attack and defense sides. In addition, remembering callouts and where enemies are by information relayed by your teammates is equally important.
Mid-map control in a map like Breeze is really important since it allows you to execute on either site. That being said, let us look at the callouts associated with this map.
- When Playing on A Site on Breeze: A Bridge, A Metal Doors, A Site, A Pyramids, A Switch, A Hall, A Rope, A Shop, A Cave, A Lobby.
- When Playing Mid on Breeze: Mid Nest, Mid Top, Mid Doors, Mid Chule, Mid Stack, Mid Pillar, Mid Bottom, Mid Cannon.
- When Playing On B Site on Breeze: B Wall, B Site, B Tunnel, B Back, B Elbow, B Main, B Window.
About Attacking on Breeze in Valorant
Breeze attacker side is one of the most fun things to execute in Valorant due to the number of possibilities. As soon as you establish some sort of mid-map control, you are free to either hit A or B Site depending on where you have had success. Since the map has lots of cubbies and open spaces, you will experience all kinds of gunfights here.
That is why, your composition should be heavily centered around grabbing information so that your enemy does not catch you off guard. In addition, ensure that you establish mid-map control as well just in case you would like to pivot to other areas of the map.
That being said, let us take a look at how you could execute on both sites, plant the spike for the best post-plant and win rounds for your team on the attack.
How to Attack A Site
A Site is comparatively harder to execute in the map rather than the other one but if you know how to work the map, it can be easy. We will use three different approaches to attack the A Site, you can vary it up, depending on your team and momentum.
For the first strategy, we will do a 3-2 mid-control setup. A Duelist paired with an Initiator can take space mid and control Mid Doors which is going to cause paranoia on enemies playing A Site. Controllers can smoke the A Pyramids which will be safer to execute if Defenders are using an Operator.
In addition, if you can, dedicate one player in A Halls you can, this will be really important to crunch enemies in post-plant. For the second strategy, we will use a 4-1 Fake setup. The objective of this strategy is to ensure that you cause enough distraction in the Mid and B Sites so that a lurker can take space onto the site and it is safe to pivot. On the other hand, if you can take control of B Site it would be safe to plant spike there.
For the third strategy, we will do a 2-2-1 mid-split. Breeze’s expansive mid can help establish lots of map control. If you take enough control of Top Mid, you can pivot into A Halls. While the other 2 players can go onto A site and a lurker can work A Cave to pinch the enemies stuck. This will take some time and effort to successfully achieve but will give you complete control of A.
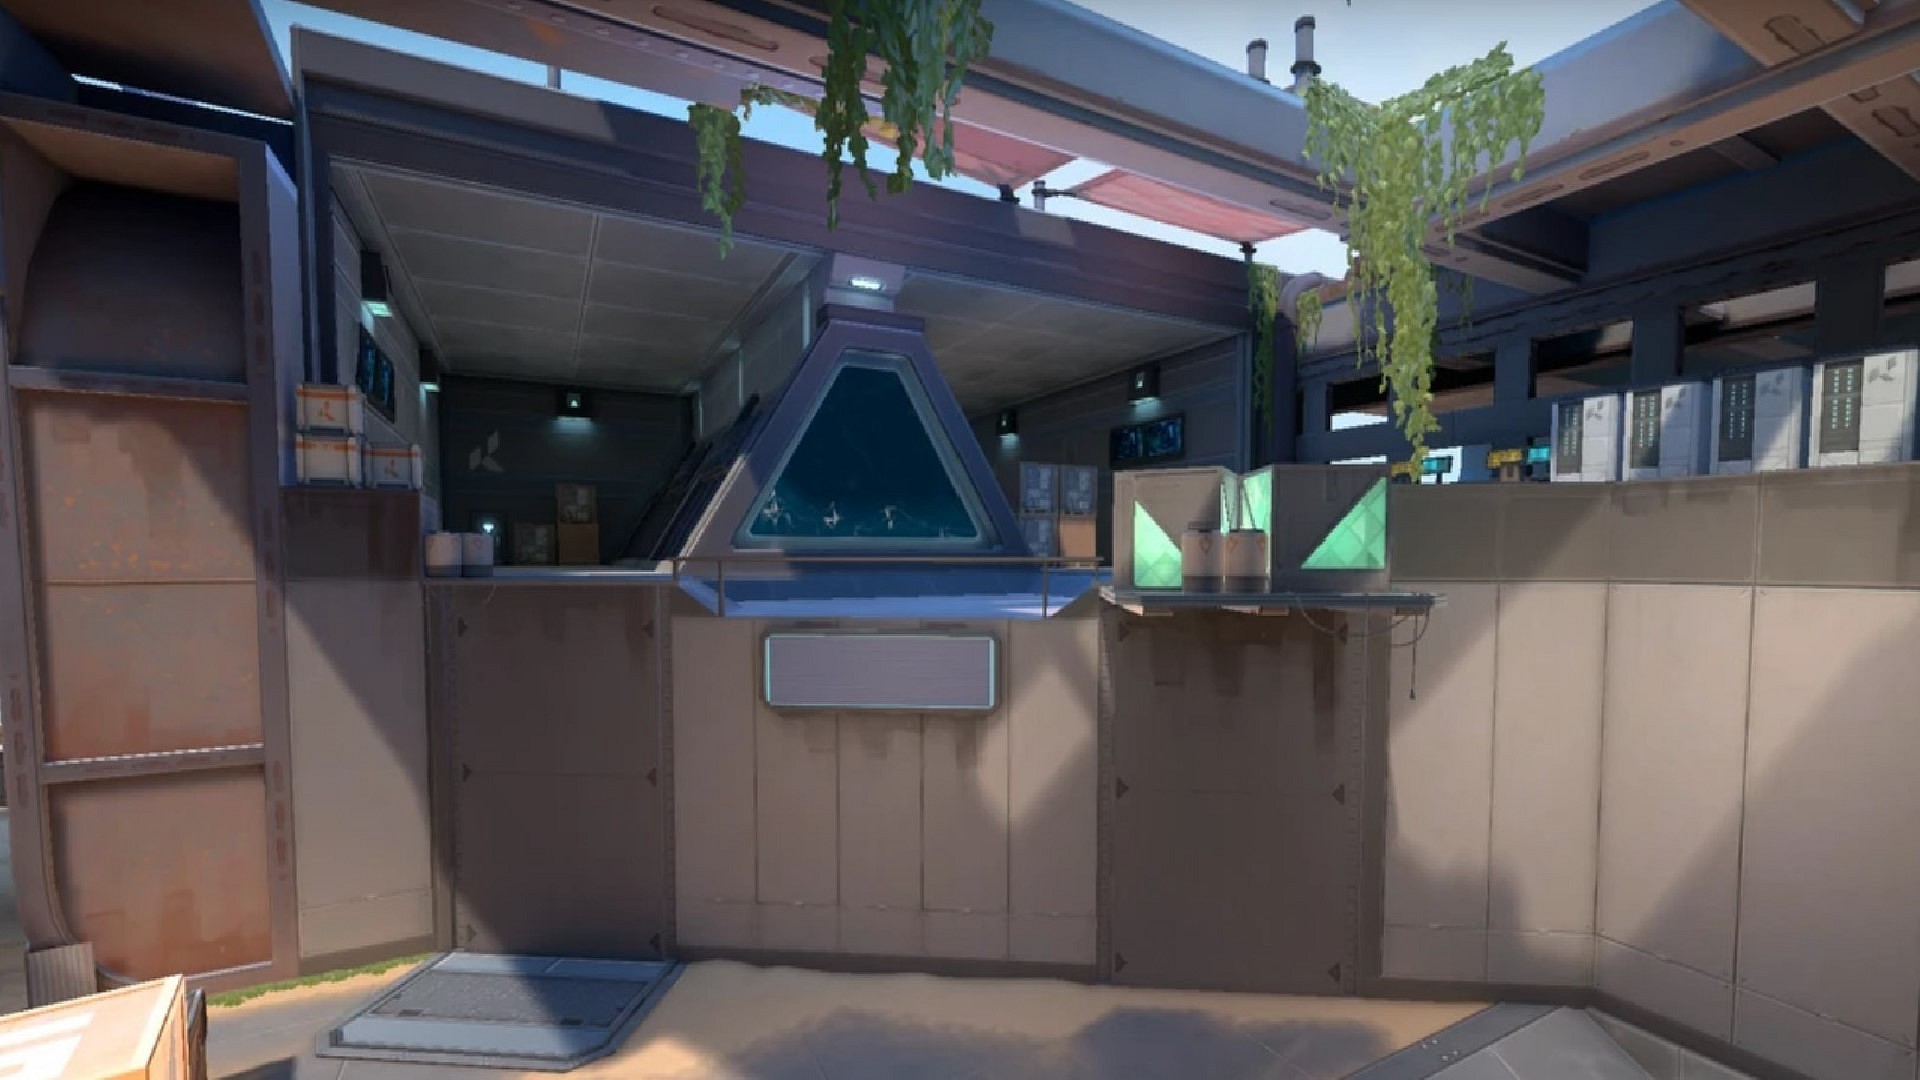
Where to Plant Spike on A Site?
Planting the spike on A just like every other map can vary according to the lineups that your teammates might have or their positions during the post-plant. Since you can plant the Spike anywhere around the A Pyramids, we recommend planting it in a way that faces the A Cave so that it is easier to play the post plant.
Ask your controllers where they need the spike planted so they can use their utility to delay the spike. You can vary the position of the spike depending on the positions of the enemy. When you know an enemy is flanking you from A Cave, it is better to top plant the spike back site or under the cover of the A Pyramids. Planting the spike depends on the enemy’s position, your controller’s utility, and your team’s numbers.
How to Attack B Site
B Site requires you to control the Top Mid, B Wall, and some control of the Mid Nest as well. We will also employ three different attacking strategies for this site. Those will be a five-man push, a 2-2-1 mid-control split, and a slow-burning 3-2 setup.
For the five-man push, we recommend that you plan it out during the pre-round, Duelists should be the first ones to take fights and Initiators should be primed to help them onto the site. The Controllers should smoke off common angles while Sentinels should set up traps on the flank and on-site. This will be a really quick execution which will require precise coordination to pull off.
For the 2-2-1 mind-control split, we recommend three starting up Bottom Mid and two on B Main. As your team establishes control of Bottom, one out of three agents will stay behind and two of them will move ahead to pick off enemies from Mid or Nest. After the two mid-players make it to Nest, the execution from the Main players begins. This is how you use Mid control to get a site.
Finally, for the 3-2 setup, we recommend two people working Mid, either trying to get the first pick or establishing mid control while the site hit comes from the 3 players playing B Main. But do this as slowly as possible to cause paranoia in the minds of enemies, causing them to over-rotate. We even suggest not making any sounds for the first 15-30 seconds to sell the fake.
Where to Plant Spike on B Site?
Planting the Spike front site overlooking B Window is the safest option for attackers since it allows clear shots from boxes in B Main. In addition, it is the most common spot to use lineups. However, if your team decides to play on-site. The best option would be to plant behind the huge pillar in the middle.
If you are playing a mid-heavy setup with control over B Main and Defender side spawn, you can plant ahead of the pillar to let the people in Mid see the bomb. Although the best one is planting slightly ahead in front of the site overlooking B Window since it allows people in Mid, B Main, and B Window an opportunity to stop the defuse.
There are many other plant spots you can experiment with but it all depends on where your teammates prefer it to be planted, especially the ones which have lineups. Those lineups can be a key to winning the post-plant.
About Defending on Breeze in Valorant
Breeze is a really balanced map. Therefore you won’t have a hard time defending the map if you have control of most areas of it. However, as Defenders, your job is to challenge enemies for map control and try to funnel them onto a site so your teammates can pick them off.
In addition, prioritizing a site is going to be much better in terms of defense rather than just splitting off into two individual sites. That is why, most of our defensive setups would include using a majority of the players in one singular area of the map. However, we will take some risks as well. Let us check out what you can do on defense for Breeze.
How to Defend the A Site
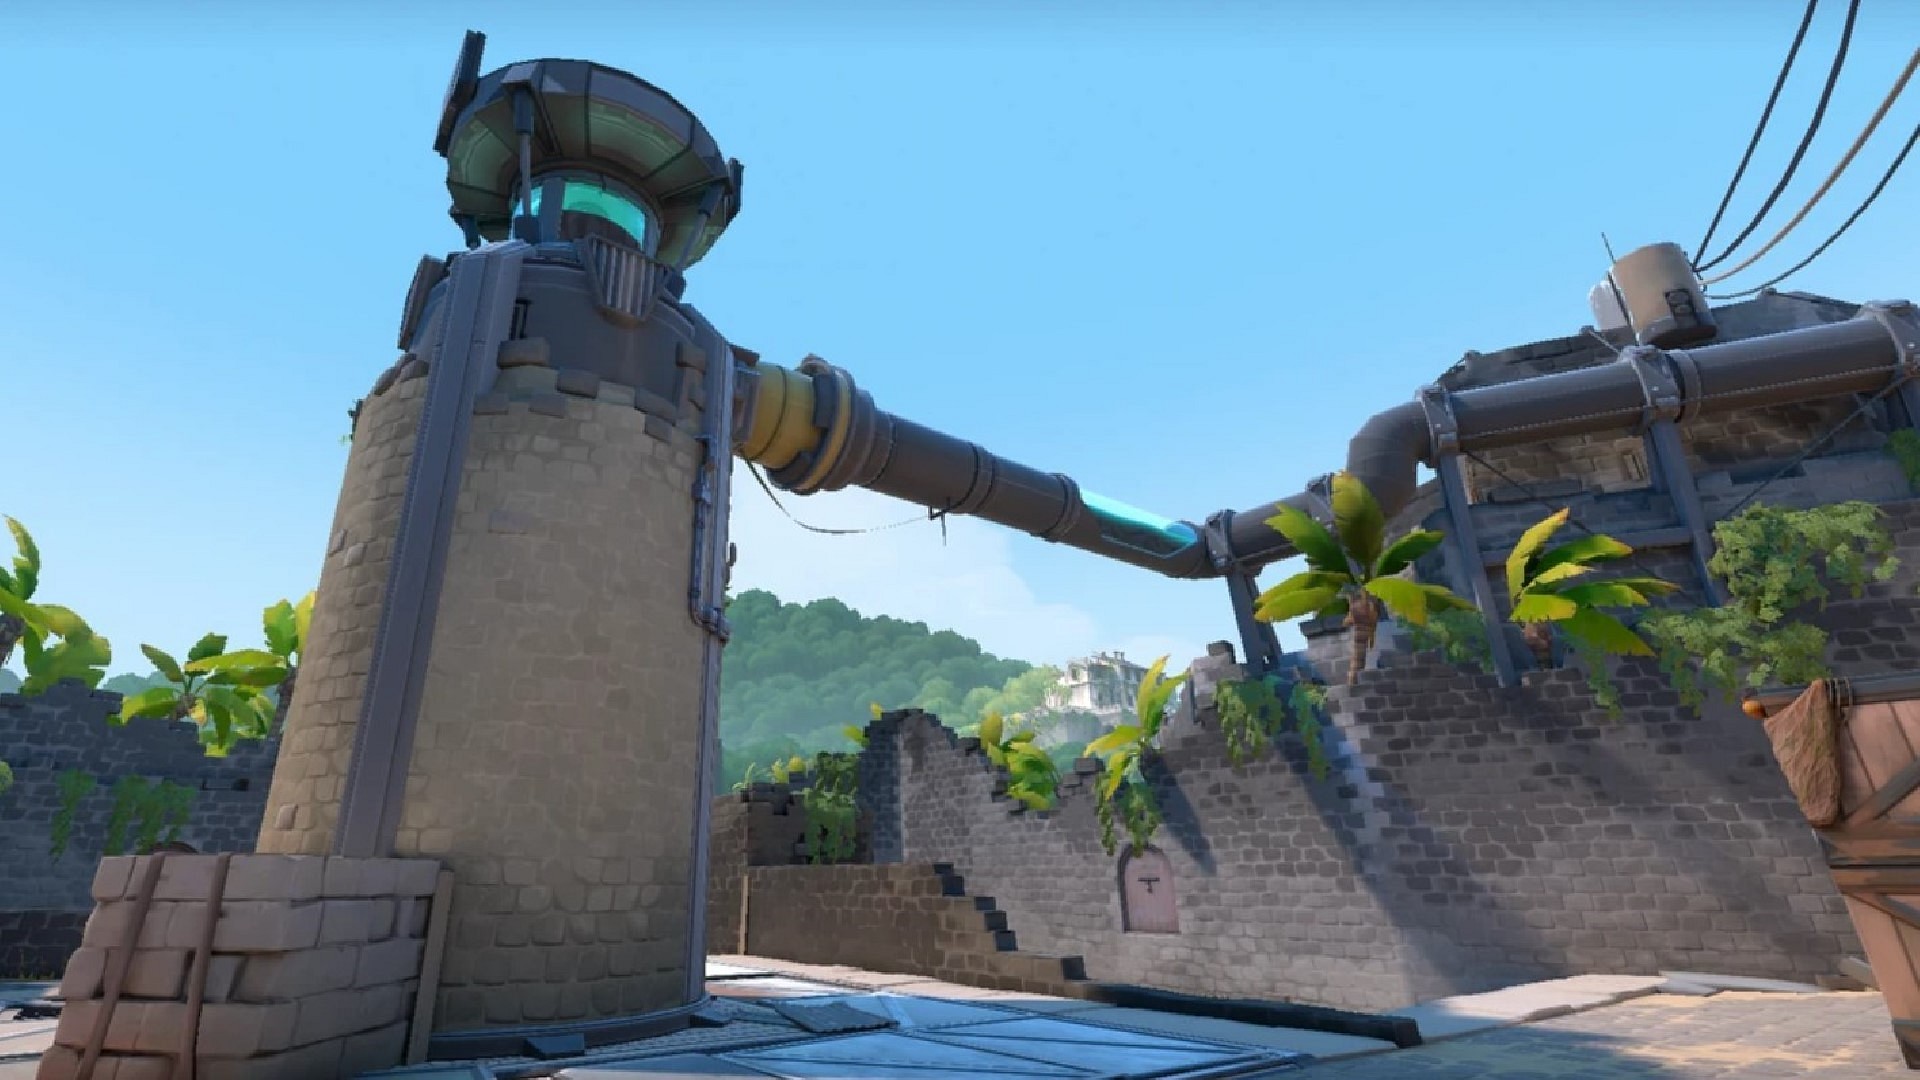
The A Site has lots of angles to watch out for but the majority of the aggression will come from A Main and A Cave. In addition, enemies can work Mid Doors to catch defenders on site as well. You will also need to watch out for lurks from A Bridge and A Switch.
We recommend running a 3-man setup for this site. One anchor should be watching A Cave and relaying information to the other two teammates. The rest of them would be posted up watching other entry points to the site. One would be near Mid Doors while the other would be near A Switch or Metal Doors. This ensures you cover all entry points into A.
Although you can also use an Alarm Bot or a Tripwire to guard Metal Doors and stack sites with your teammates either behind Orange Containers or Pyramids. We recommend running a Sentinel, a Duelist, and a Controller on this site. The Sentinel would watch Flanks and Metal Doors while the Duelist can watch either Cave or Mid Doors. The Controller can help block off entry points after early information.
Duelists are free to take space and be aggressive since their abilities allow them to get away without harm. In addition, you can switch the Controller with an Initiator to help the Duelist.
Ways to Retake on A Site
Now, retaking on A can be difficult but not impossible. You will need Controllers and Duelists to give you cover and the number’s advantage respectively if things go south. On a retake, start by taking control of A Metal Doors and A Bridge, after that clear Mid Doors and A Pyramids slowly. Use Initiator utility to gather information and displace enemies. You can also use lethal utility to deal damage.
After you do, you will have to smoke off A Cave and get the spike defused at least halfway. You have to possess the number’s advantage for the retake otherwise it will get progressively harder. When you acquire Mid Doors and Caves control, maintain it because there is a chance the enemies might flank from Mid.
The enemies might also use lineups so aggressing through mid to the Attacker spawn can also be an option early on in the retake. In addition, your Ultimates are going to be really valuable for the retake so ensure you save them.
How to Defend the B Site
Defending the B Site is going to require control of Mid, Site, and complete control of Defender Spawn so that you do not get caught off guard by lurks. You can start off defending B by establishing dominant control of B Site. The best way would be to set up an Operator player on top of the pillars on the site.
If you want to play aggressively, place an enemy in B Elbow aggressively for early information. Ensure that it is a Duelist so that they can get away. In addition, playing in B Wall will be a game changer since it is an uncommon angle to play plus it gives you a good sightline into Mid as well. Ask your Duelists to get early picks. Fall back, keep the numbers advantage, smoke off the entrance, and make for enemies to fall in.
Although we would recommend the Sentinels to play on this site because if one cannot control Mid here it would be a problem. That is why, we recommend starting off with getting mid-control so you can solely focus on controlling the site.
Ways to Retake on B Site
To retake B, start off by working Mid Nest and see if Top Mid and Elbow are clear. If possible, lurk from Elbow to B Main so that you can get the jump on enemies waiting to play post-plant or crunch enemies on site.
Smoke off B Main Entrance and Mid once you establish control and start retaking the site. B Backsite can be difficult to retake since the enemy can run circles using various angles. The only way to flush them out would be to use Initiator and lethal utility like Raze Grenades, Boom Bots, and Shock Darts.
Also, you can utilize your Ultimates to get an advantage. A Fade or a Breach Ultimate is really useful on this map. Your Controllers are going to be really important in the retake as well so ensure you have the maximum numbers here.
Best Agents to Pick On Breeze in Valorant and Why
Let us look at the best Agents you can pick for each Agent category in the game for the Breeze Map.
Duelists
- Jett: Jett can easily get aggressive without having to pay the price for it. Her abilities are good for getting picks and reducing enemy numbers. Her Blade Storm is good for eco rounds.
- Phoenix: Phoenix’s abilities are good for space creation and dealing with damage. His Ultimate is good for storming into sites, getting picks and information.
- Yoru: Yoru can teleport and save a lot of time in rotation which makes him one of the best Agents to pick on this map. His flashes are good for getting picks and retaking while the Ultimate is essential for gathering information.
Initiators
- Sova: Sova is a versatile Agent in the game. His lineups can help in delaying the spike defuse and his Drone and Recon Dart are one of the best ways to get information in the game. A go-to Initiator for any game, Sova’s Ultimate is perfect for post-plant and delaying the spike defuse.
- Fade: Fade is an alternative to Sova and she can be just as good as him. Her prowlers are good for clearing corners, and her Ultimate can turn the tide of the battle. You can combine her Decay abilities with lethal ones like the Raze Grenade and Viper Snake Bites for huge damage.
- Kayo: Kayo’s ability to suppress the enemy’s abilities is unmatched. It can help in capturing sites and delaying enemy retakes. His abilities are crucial for post-plant as the flashes will distract enemies while the grenade can damage and delay the defuse.
Sentinels
- Cypher: Cypher is the preferred Sentinel for most because his tripwires can lead to information and easy spam kills. In addition, his Spy Cam can help a lot with enemy positioning if placed well and the Cyber Cages can be used as cover to get away and into sites.
- Killjoy: Killjoy can lockdown an area pretty well by herself. Her turret does decent chip damage and acts as a second alarm bot. The best part about her abilities is that they have lots of synergy and can be combined together pretty effectively.
- Sage: You will need a healer for this map and there is none better than Sage. Her heals can make a huge difference while her Barrier can close down an area. Her Slow Orbs are crucial in slowing down pushes while the Ultimate can turn the tide of the battle for good.
Controllers
- Omen: Omen’s smokes are effective, long-lasting, and large enough to navigate through. He is suited to aggressive players and shines in the hands of players willing to take a risk. His Paranoia is crucial for retakes.
- Astra: Astra’s abilities are perfect for both attack and defense. On attack, she can help delay the defuse while on Defense she can shut down enemy pushes. Her Cosmic Divide is perfect for quickly getting map control and denying information to enemies.
- Harbor: Harbor’s introduction to the game has changed the Controller meta for good. His abilities are perfect for planting and defusing and maintaining map control. He can also help deny information flawlessly making him one of the best Controllers in the game.
- Viper: Viper’s abilities on Breeze’s defense are overpowered. Her Orb and Wall can help deny entrance onto enemies and the Snake Bite can help weaken the enemies for easy kills. The Viper’s Pit is the most difficult thing to counter if teamwork is missing.
Tips to Remember When Playing Breeze in Valorant
Here are some of the best Breeze tips that can help you get an advantage over enemies.
- Use the Metal Shaft in A Hall to quickly rotate over to B or regroup with your team in Attacker Spawn. However, do so only when you know Bottom Mid is clear.
- If you are playing an Agent like Jett, Raze, Omen, or Chamber, you can use their abilities to get on top of boxes or other crates before the round starts to get an unorthodox angle on the enemies for easy kills.
- Having a good Controller player can save you tons of effort in the game. They can close down enemy pushes and help with defense a lot. Ensure that you have a trusted player pick a Controller.
- Communicate callouts effectively. Miscommunication can be the difference in you winning or losing the round.
- Learn lineups for both sites. They can help delay the enemy defuse and damage them.
Those are all the things you need to know about Breeze in Valorant. For more Valorant content, click here.
About the author
-

Swetabh Shekhar •
A Survey by Call of Duty: Modern Warfare II Could Fix This Long-Standing Issue in Future COD Games
-

Aaryanshi Mohan •
Genshin Impact 3.6 Banner Schedule: Nahida, Nilou, Baizhu, Kaveh, and Ganyu Phases Revealed
-
Adnan Juzar Kachwala •
Valorant Pacific Playoffs UB Quarters: Team Secret vs Zeta Division; Head to Head, Predictions, Rosters and Where to Watch
-

Adnan Juzar Kachwala •
Dota 2 Ancient Dragon King Cosmetic Receives Its First-ever Ancient Skin
-

Ripan Majumdar •
Fallout and Magic The Gathering Collab: Bethesda Tease a Possible Collaboration With Popular Trading Card Game Magic: The Gathering
-
Tanmaiy Reddy •
Undercity Valorant, the new Collection, and its release date and time