Valorant Pearl Map Guide: How to Master This Map Based in Lisbon

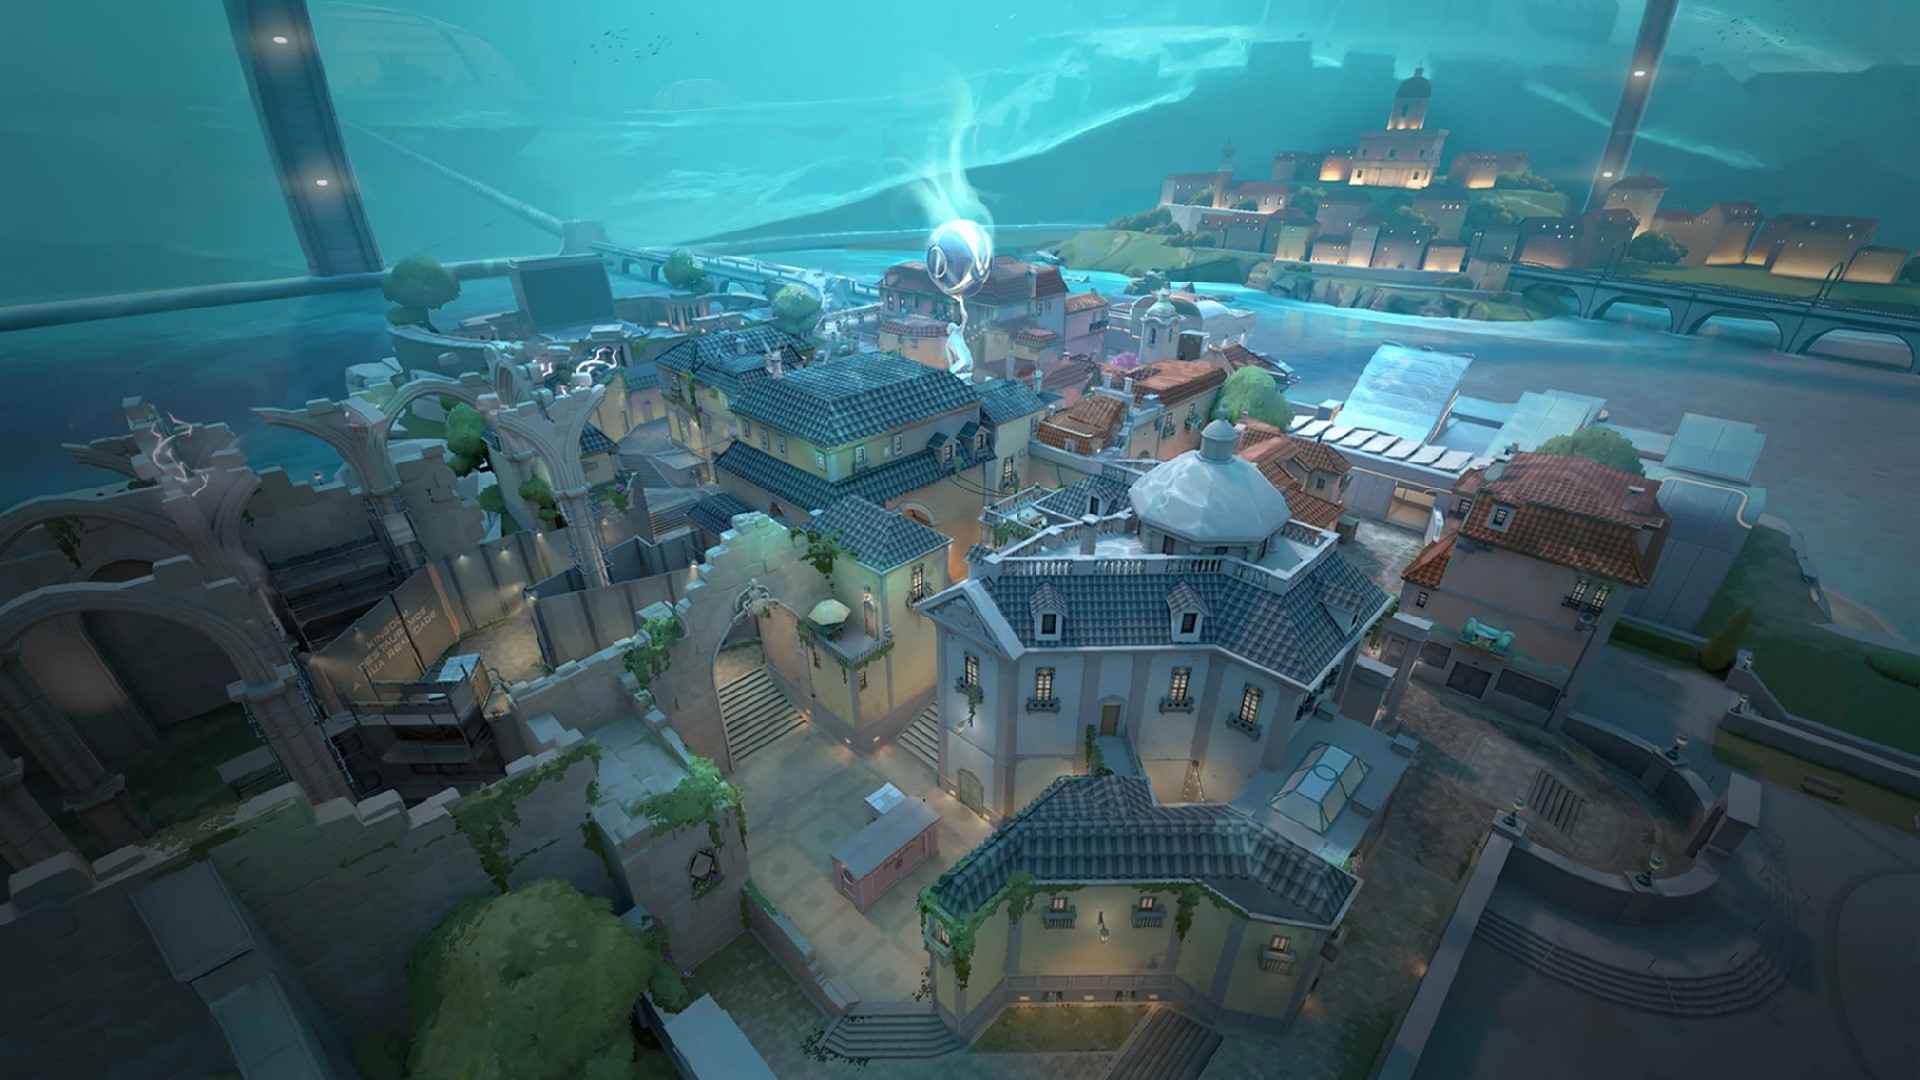
Pearl is a map in Valorant based in Lisbon. It has two sites and multiple entry points. However, it is the most well-known because of the post-plant capability the map allows due to its design.
Pearl before the changes and balance patches had one of the most unfair B-site designs in the game. Players could plant the bomb in an open plant spot on B and then play post-plant from ramps. This was especially prominent in professional Valorant where we saw lots of teams take advantage of the map design by slowly using their utility over time to delay the spike defuse.
However, since the Pearl map balance, the post-plant utility is a little bit difficult to use due to a couple of B site changes. We will discuss how to go through a B Site hit in this guide along with everything you need to know about the Pearl map in the game. Without further ado, let us get into it.
Contents
- Valorant Pearl Locations and Callout Guide
- About Attacking on Pearl
- How to attack A Site
- Where to Plant Spikes on A Site?
- How to attack B Site
- Where to plant Spike on B Site?
- How to attack A Site
- About Defending on Pearl
- How to Defend the A Site
- Ways to Retake on A Site
- How to Defend the B Site
- Ways to Retake on B Site
- Best Agents to Pick on Pearl and Why
- Tips to Remember When Playing Pearl in Valorant
Valorant Pearl Locations and Callout Guide
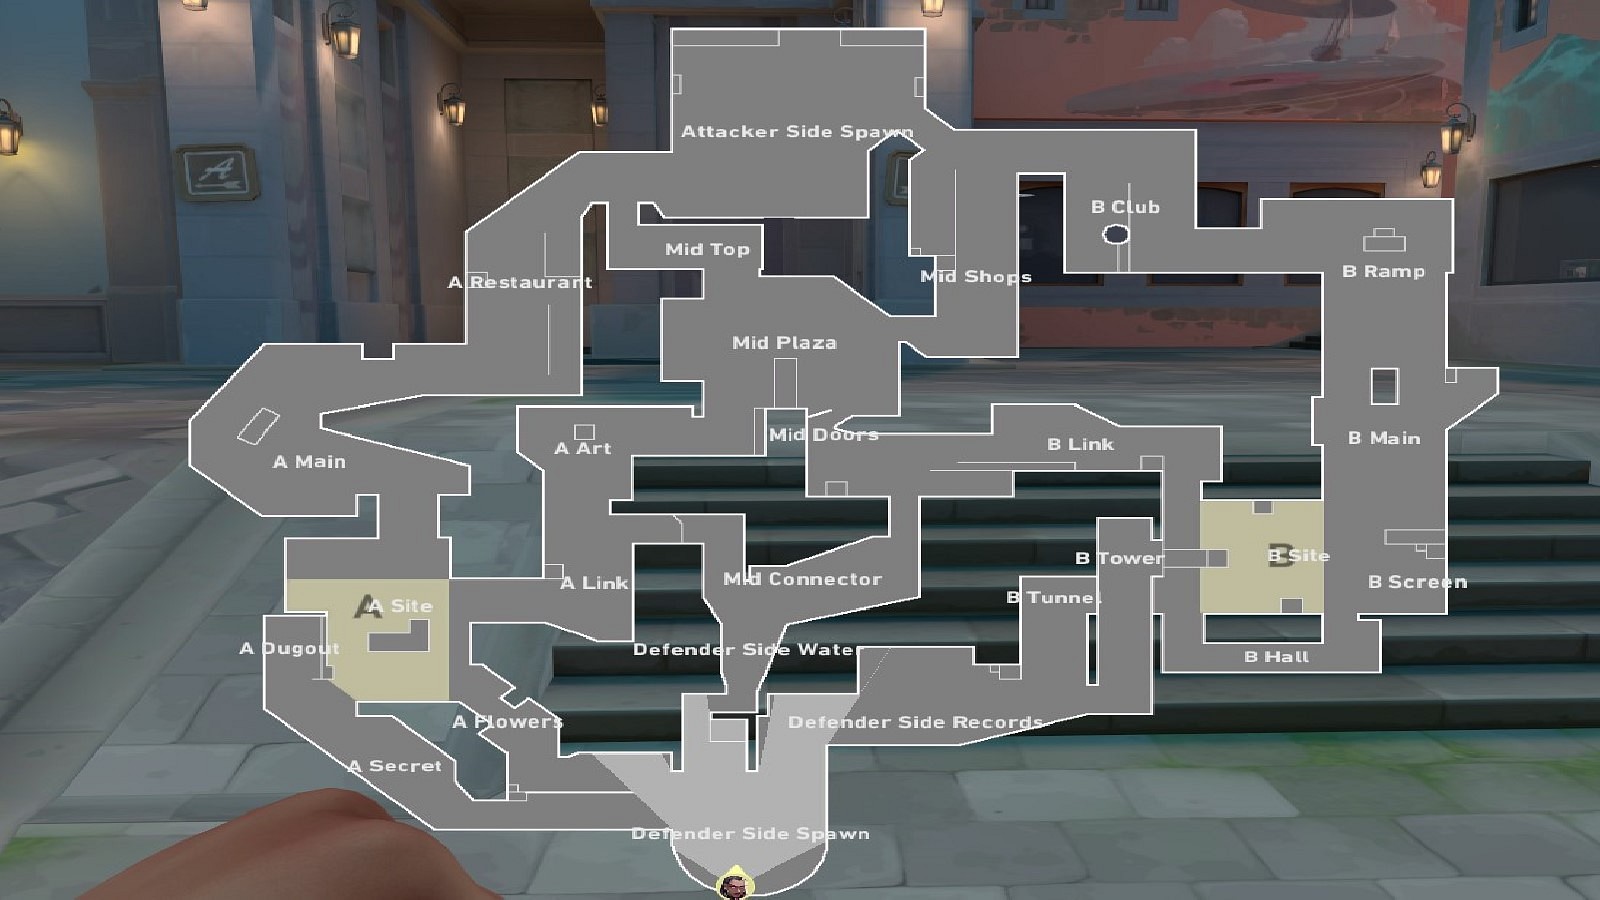
Pearl is easier to learn in comparison to the other three site maps like Lotus or Haven. These two sites are balanced enough for both attackers and defenders now that the patches have fixed some errors. That being said, let us look at the callouts associated with both sites and the mid-area.
- When playing on A Site on Pearl: A Restaurant, A Main, A Site, A Link, A Art, A Dugout, A Flowers, A Secret.
- When playing Mid on Pearl: Mid Top, Mid Shops, Mid Doors, Mid Connector.
- When playing B Site on Pearl: B Club, B Ramp, B Main, B Screen, B Hall, B Site, B Link, B Tower, B Tunnel.
About Attacking on Pearl
Attack on Pearl can be a really simple thing if you have enough team coordination. The team has to at least have one Initiator and preferably two Duelists who can create the space required for teams to enter the site, plant, and delay as much as possible. Playing long-range is the most preferred call you have to take no matter which site you are playing on.
Most of the teams prefer attacking B because it is really difficult to defend and has a higher chance for post-plant success. That is why, we would advise you to prefer attacking B but switch it up if the enemy is predicting your moves. We are going to give you several ways to approach sites in the Attacking Site sections of this guide so you have options. That being said, let us see how you can Attack the A Site.
How to Attack A Site on Pearl
The most basic way to attack A Site would be a two-three setup where two people are pushing mid to create space in A Art and A Link while the rest of the three Agents take space in A Main space. Then the site hit would be much more coordinated and easier to execute.
In addition, the mid pushers need to ensure that the enemies do not reclaim the space on mid, so they need to keep an eye on the flank. They can also retreat to either A Site or A Main to play with the rest of the team in the post-plant. Ensure that you have both the Duelists in the A Main push because the distraction they create will be important for the ones pushing mid.
Now, Smoke off the Flowers and Back Site of A to ensure that the people in Art have a safe passage on the site as well. You can also try an all-out push from A Main with all five members hitting the site. This will overwhelm the enemy. You can also try a 2-2-1 setup where two players are controlling A main, 2 players controlling mid and one player lurks on the other site B.
You can use this setup to hit the weakest site or take the majority of map control to successfully break apart the enemy defense. That being said, let us see how you plant the bomb.
Where to Plant Spikes on A Site?
The most preferred spot would be next to the A Vending Machines because you can place a lot of post-plant utility quite easily. Plus it is the easiest lineup to learn for Agents like Viper and Brimstone. You can use the vending machine itself and plant in the cover of it to ensure you do not get shot from A Link just in case no one is watching there.
Ensure that the Back Site of A is smoked off so you do not get peeked. Also, you need to clear Dugout with a Raze Grenade or any other utility. If it isn’t cleared, the enemy can spam the walls to get a kill on the planter.
How to Attack B Site on Pearl?
B is undoubtedly the preference for most attackers on Pearl. The key to starting a good B Site hit is to pressure both mid and B Ramps. Getting Ramp control is the basis of a B hit. After that, it is just a matter of the mid-lurk crunching the ones holding B Link. You will need both Duelists on hand for this hit.
There are three different ways to enter B Site. One is through Ramps, the other through B Link with the mid-lurk, and the last one is flanking through Defender Spawn. The third one is the longest route and if your team has the enemy boxed in on-site, it might be the most rewarding.
Start off the site hit with a three-two setup. Three people pressure ramps while the other two go through mid. Your priority is to take control of Ramps and punish over peeking enemies. Wait for the two mid-lurks to completely clear Mid Doors and B Link before executing on-site.
Smoke off Tower and B Tunnel and clear Halls to get a safe plant if your flank team has cleared B Link. Play the post plant through B Ramps and make sure to use your utility to delay as much as possible. Your damaging utility will help you immensely in delaying and getting kills during post-plant.
Alternatively, one of those mid-lurks can make its way from Mid Connector to the Defender Spawn to cut off enemies rotating from A. They can also flank behind the enemies and get a kill on the enemies watching B Site from Tower. Other setups include a 2-2-1 setup with two players getting Ramps, two pressuring mid and one lurking A.
Where to Plant Spikes on B Site?
Most people prefer to plant the Spike behind the stack of Radianite Boxes overlooking B Ramps. It is the most convenient and easiest to hold post-plant. Although, you should have at least one person in B Halls so that it is difficult for the enemies to retake.
Plus, even if the person in B Halls dies, you will have enough delay utility until the Spike explodes. Also, make sure at least one person is watching the flank because there is a high chance an enemy is flanking you.
About Defending on Pearl
Defending on Pearl requires a lot of team coordination because it might be hard dealing with all the enemy utility and pressure alone. A lot of professional teams go for the standard 2-2-1 setup. Two people hold A, Two people hold B and one person watches Mid and gets information.
However, Defenders should not just wait for the enemies to approach their site. Playing aggressively and pushing to a certain point can be really helpful for your whole team. Suppose you are playing on A, do not just hold Dugout. Push till A Main and gather early information. This will help your team rotate.
Make sure your Sentinel always remains on Site, however. Most teams will have their Sentinel play on B. But a Sentinel on the A Site is also a good idea if you observe that the opposition is frequently hitting that site. It is also a good idea to have a Controller that has a global presence so it is easy to smoke your site off just in case enemies rush.
How to Defend the A Site
Now, as we mentioned earlier, it is crucial to have at least one Sentinel on one of the sites. Run a 2-2-1 setup as usual. Although, you can switch the strategy up and keep the Sentinel on the B Site and heavily stack the rest of the map. Stack A with three Agents and have one guarding B Link. This can help you have decent map control.
Although if you are solo watching A as a Sentinel it is a good idea to play Dugout or Site. Your only objective is to delay the enemy plant, get a kill or retreat to start a retake with your team. If you are any other Agent you are free to extend out of A either to Main or to Art for information. This can help you prepare for the site hit if enemies decide to go to A.
Ensure that the player watching Main or Art does not die because you will need him to hold or at least delay so that your teammates can rotate over. On rare occasions, your teammate can extend over to the Enemy Spawn in case there is a lack of information or the enemy is hitting the other site. Now, let us see what you can do if the enemy has control of the site.
Ways to Retake on A Site
Now, to retake, ensure that you have control of Dugout and Flowers. Use your utility to Smoke off A Main entrance, and A Link. This can let your team funnel into the site. Use the Initiator utility to gather information on enemies present on site if any. It would be a good idea to use any Ultimate you would have to either get the numbers advantage or get off a defuse.
The most important part is the use of your smokes since it will deny the enemy a lot of information about your whereabouts. A lot of enemies will try to flank for A Art and Link so can keep an eye on there. Maintaining a numbers advantage and prioritizing the defuse is the key to a successful retake. Controllers are going to be quintessential in these scenarios.
In addition, try to block, destroy or delay the enemy’s utility as much as you can so the defuse is successful. Although if you are the last person standing and you are fighting more than two enemies, it would be a good idea to save.
How to Defend on the B Site
The B Site is the hardest to defend due to all the possible ways the enemies can attack it from. Plus if you are a Defender peeking from B Halls to Ramps, you are guaranteed to at least get damaged if not killed by the enemy because it is such a common spot.
The best way to approach defending on the B Site would be with a Sentinel. Use their setups to chunk down the enemy HP or at least gather information about the whereabouts of the enemy. If the Sentinel is the solo site anchor on B, one Agent has to watch B Link and Mid Doors just in case the Sentinel gets flanked from the other site. B Tower, B Tunnel, and B Halls are common peek spots that can net you kill if you are timing your peeks right.
Players have to ensure the Sentinel is always present on the Site itself watching the enemies and halting their progress as much as possible. If you have control of B Halls, it is really important to maintain that control since it is crucial for the enemies to have. Losing Halls control would be losing the majority of site control.
If you are a Duelist, ensure that you can get early picks by using an Operator and head glitching on B Screens. It can help you gain the numbers advantage and may cause the enemy to make mistakes.
If two players are prioritizing B instead of one, the Sentinel can hold B Link and Site while the other Agent is free to do whatever they want. Flanking the enemies, playing behind cubbies on Ramps, Maintaining Halls control or Playing B Tower are just some of the things you can do.
Ways to Retake on B Site
Retaking on B is a difficult task but with the right utility combos, you can manage. First, you need to establish Hall control and clear out B Link. You can clear Halls by using utilities such as the Fade Prowler and the Raze Grenade while you can clear Link by dedicating a player there.
Now, most of your enemies will resort to utility to delay the defuse. That is why, we either need to block off their vision, destroy the utility, or attack them head-on. If you have any Ultimates that will debuff the enemy use them. The Cosmic Divide of Astra can help split the whole Ramp so you can defuse.
You can also use Smokes to block B Ramps and B Main. This will allow you to get the bomb defused halfway through. Your priority is to protect the defuser and distract the enemy long enough so that the defuse is possible. You can also use B Screens to take enemies off the Headglitch near B Ramps. B Screens are going to be crucial to both the defense and retake of the B Site.
Best Agents to Pick on Pearl and Why
For a strong team composition, you should ensure that you have at least One Sentinel, Two Duelists, and a Controller. You can finish off the composition with a good Initiator. Although there are many other compositions you can try, this is just an example. That being said, let us see what the best agents are for the Pearl Map.
Duelists
- Jett: One can use Jett’s abilities to get out of dodge after taking an early peek and she has smokes which can allow her to retreat. In addition, the Blade Storm can be an excellent tool for Eco Rounds.
- Raze: Raze’s utility can delay the enemies and do tons of damage to enemies stuck in different spots. The Ultimate can be the best space creation tool for your team if used in combination with the Initiator utility.
- Neon: Neon’s speed can help with space creation and site hits. Her Wall can let your team through and give you control of the site while her stuns can help in post-plant or to push enemies. The Ultimate can be a huge Eco Round Tool while her Signature Ability can help in quick rotations both on attack and defense.
Initiators
- Kayo: Kayo’s ability to neutralize the Agent’s abilities is going to be quintessential in stopping site hits and canceling out enemy Ultimates. He will also be important in providing assistance via Flashbangs and Grenades for post plants.
- Sova: Sova is one the best Initiators in the game due to his versatility. You can get information and do lethal damage with his abilities. His Ultimate is one of the best tools for post-plants.
- Fade: Fade can help support your Sentinels really well with her prowlers and the Reveal. This can help you know about the location of the enemy and their whereabouts.
Controllers
- Astra: Astra is one of the best Controllers on this map due to her utility which helps in either setting up her teammates or delaying the defuse in post-plant. The Cosmic Divide is one of the best Ultimates for both attack and defense if used properly.
- Viper: Viper can deny lots of information with her Wall and Orb abilities. In addition, they are great when combined with her post-plant utility like the Snake Bite which does lots of damage if the enemy is vulnerable. She is a great Agent no matter the situation.
- Omen: Omen is for aggressive players who also want to play Controllers. His teleport can help you reach the top of boxes and heaven angles. Plus his smokes really help in securing space for the team. The Omen Paranoia is one of the best pieces of utility you can use to clear space and get enemies off angles.
Sentinel
- Killjoy: Killjoy is the best Sentinel you can use for this map. She can lock down a site with her Nanoswarms. Her Alarm Bot can detect enemies, watch flanks and apply vulnerability to the enemies. Her Lockdown is the Ultimate tool for retaking while the Turret can do chunks of damage if not dealt with immediately.
- Cypher: Cypher’s utility can be annoying to deal with and most players use it to get free kills with the help of the trip wires. Setup traps in such a way that the enemies do not expect it. In addition, his Ultimate is easy to obtain which is why, it can be used to get early information.
- Sage: Sage is quite a popular pick on Pearl due to her wall denying lots of utility usage. Now that we have reduced reserve ammo in both Vandal and Phantom, people will spam a lot less which makes the Sage wall a worthy investment. Plus, her healing can help you maintain the advantage over the enemies.
Tips to Remember When Playing Pearl in Valorant
Here are some tips you should remember when playing this map.
- Ensure that you get early information no matter what side you are playing, this will help your team set up better hits or retakes.
- Double Peek angles with your teammates.
- Communicate anything and everything. Ensure that you do not miss out on important details like the enemy, HP, position, and more.
Those are all the things you need to know about playing the Pearl Map. If you like this kind of Valorant content, click here for more.
About the author
-

Adnan Juzar Kachwala •
Warzone 2 Season 3 Update Details and Patch Notes are Here! 150 Players in One Lobby!
-

Adnan Juzar Kachwala •
God of War Ragnarok: The Best Axe Skills to Get Right for that Sweet Frost Damage
-

Angana Mazumdar •
Honkai Star Rail 1.2 update livestream summary
-

Adnan Juzar Kachwala •
Persona 5 Tactica: Everything You Need to Know Before You Buy
-
Adnan Juzar Kachwala •
Fact Check: Will Minecraft Legends Release on Xbox Game Pass? And 3 Things to Keep in Mind!
-

Danyal Arabi •
Stranger Things to get a VR game in late 2023