
Minecraft has creative outlets and trading opportunities that reward players who want to explore and try something new. This Villager Trading Guide will explain just how important it is in Minecraft.
Interacting with NPCs has always been at the forefront of gaming, and Minecraft is no exception. That is why villager trading is such an essential aspect of this game. It helps obtain certain items and is an immersive part of the gameplay that rewards the players pursuing specific trades.
Everything from enchanted books to potions and maps can be obtained when trading with the villagers. You can find them in Minecraft villages milling about living their lives. To fully capitalize on their offer, we must understand the whole system, top to bottom in the game. Let us break it down.
Contents
- Minecraft Villager Trading Guide: Everything You Need to Know
- How to Find Villagers and Interact with Them
- How to Unlock Trades and Improve Them
- How to Avail Discounts and Get Special Offers
- How to Reset Villager Professions
Minecraft Villager Trading Guide: Everything You Need to Know
Many factors influence trading with these NPCs, just like in real life. The trade prices will depend on factors like supply, demand, the villager’s mood, and their profession and level. The various jobs these villagers have to decide their trade pool. We will take a look at this later.
Villagers can also run out of items once they reach a certain number of trades done. To participate in transactions, you will need emeralds. Searching chests in ruins, igloos, shipwrecks, and so on would be best to find them. Let us look at how you can discover Villagers in Minecraft and then interact with them to perform trades, level them up, and reset their jobs.
How to Find Villagers and Interact with Them
The first step to initiate trading with any villager is to find one. Villages appear randomly in any biome ranging from tundras, snow, taiga, plains, savannah, etc. As we mentioned, when you enter a town, you can search around and find chests that give you emeralds you can trade with.
Now, the villagers don’t all look the same. They have different professions and jobs, and you can find that out based on their appearance. In total, there are 15 types of occupations present in the game. Cartographers, Butchers, Armorers, Fishermen, farmers, clerics, librarians, Leather Workers, Fletcher, Stone Mason, Shepherd, Nitwit, Toolsmith, Weaponsmith, and Unemployed.
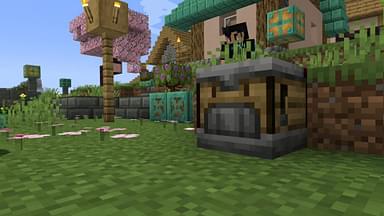
There is also a Wandering Trader, which spawns randomly around the player and offers random trading items. To start trades, villagers must claim a specific block related to their domain. For example, a Weaponsmith must have a Grindstone, while the Toolsmith must have a Smithing Table. There are unique blocks for every village profession.
Most of the time, you will need emeralds, but villagers might demand specific items for trading, such as flesh or gravel, depending on their profession.
How to Unlock Trades and Improve Them
When you approach a villager and trade with them, they gain trade XP upon a successful trade. Do that enough times, and you will raise their level of trading. There are five distinct trading levels for each villager. Let us briefly look at them in the list below.
Village Trading Levels
- Novice (One Trade)
- Apprentice ( Two Trades)
- Journeyman (Three Trades)
- Expert (Four Trades)
- Master (Five Trades)
Leveling up a villager grants you access to newer trades. You can tell the current level of any trader by looking at the badge color on their outfit. There will be five colors for each, as there are five different levels.
Villager Badge Color
- Stone (Novice)
- Iron (Apprentice)
- Gold (Journeyman)
- Emerald (Expert)
- Diamond (Master)
To improve the trade’s quality, you must ensure that you treat the villagers right. Trade quality is influenced by Reputation, which is a hidden score that changes depending on how you interact with villagers. It affects the mood and the prices of the villagers as well.
To improve this score and to stay on the villagers’ good side, you can perform actions that will reinforce your good intention. These actions include defending villages from raids, frequent trading, curing zombie villagers, etc. A good reputation will provide you with discounts and special offers, while a bad one will increase prices.
How to Avail Discounts and Special Offers
Trading in Minecraft works the same in real life in some way. The more you trade, the more the demand increases and the price of goods go higher. On the opposite end of the spectrum, if you trade less, then the demand value is low. Therefore, the cost of goods will be low. This is the primary way to obtain some discounts on goods and services.
Now to get special offers, you will need to do some heroics. As we mentioned earlier, you can defend a village from a raid to earn a good reputation from the villagers. But that is not all it will do. Defending the village successfully significantly reduces the price of the goods by something called the “hero of the village” effect. It lasts an hour, so ensure you get your trades in before the timer runs out.
Sometimes villagers are willing to trade for only a single emerald. To identify these villagers, look for green shiny particle effects floating around their person and approach them to look at their trades.
How to Reset Villager Professions
You can change villager professions according to your convenience as well. As mentioned, villagers will require certain blocks to carry out their careers. These professions will offer specialized items related to that trade. Knowing every workstation for villagers is essential if you want to reset their professions.
Here are all the villager professions and their workstations you need to know about in the game.
- Armorer: Blast Furnace
- Butcher: Smoker
- Cartographer: Cartography Table
- Cleric: Brewing Stand
- Farmer: Composter
- Fisherman: Barrel
- Fletcher: Fletching Table
- Leatherworker: Cauldron
- Librarian: Lectern
- Stone Mason: Stonecutter
- Nitwit: N.A
- Shepherd: Loom
- Toolsmith: Smithing Table
- Unemployed: You can assign any block to them
- Weaponsmith: Grindstone
- Wandering Trader: Spawns Randomly
Now, you can place any of the blocks above near an unemployed villager to give them that related job. Suppose you place a Lectern near an unemployed villager; they will now become a Librarian.
Although the reverse is also possible, where you remove the block and leave them unemployed, please familiarize yourself with this system because it is essential for your convenience as the player.
That is everything you need to know about the villager trading system in Minecraft. If you like this in-depth guide, perhaps you’d like some of our others. Click here to check them out.